A Household Mending Basket for Everyday Clothing Repairs
A household mending basket keeps clothing repairs close at hand, so you can fix simple faults, set aside harder jobs and decide when a garment is beyond repair.
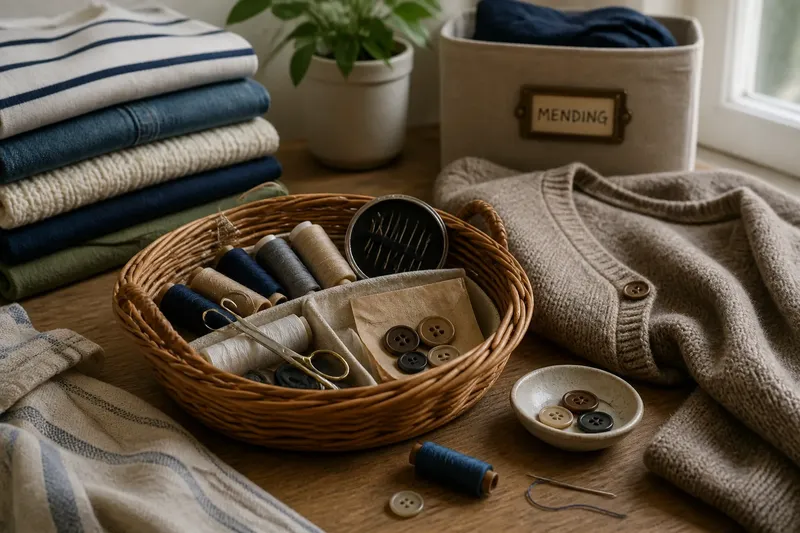
Where should a household mending basket go so a loose button does not disappear into the laundry pile? Put it where clothes are folded or put away, and keep only supplies for repairs you are ready to do. That makes a small fix easier to begin without turning every damaged garment into a project.
Choose a useful spot
Use a tin, shallow basket or lidded box that keeps the contents together. A folding table suits a household that sorts laundry there; a small tin near a chair may suit someone who prefers to mend while sitting. Choose a dry, stable place that is easy for intended users to reach.
Keep needles and scissors secured, especially where children may be present. If the supplies are out of reach for safety, store the container in a known cupboard and return it to the work area when needed. There is little benefit in putting the basket somewhere convenient if its tools cannot be stored safely.
Match supplies to repairs
Start with hand-sewing needles in a case, thread in colours that suit clothes worn often, small scissors, a needle threader and spare buttons saved from garments. Add a thimble if pushing a needle through heavier fabric is uncomfortable. A small repair patch may help with a particular garment, but include it only when you have a likely use for it.
- Needles: Check that a needle passes through the fabric without undue force; if it does, use it for that repair, and if not, choose a more suitable needle or ask for help.
- Thread: Check whether the colour and type suit the garment; if they do, use it, and if they do not, find a better match or leave the repair until you have one.
- Scissors: Check that they cut thread cleanly; if they do, keep them in the basket, and if they do not, sharpen or replace them rather than struggling with frayed cuts.
- Buttons: Check whether a saved button fits the garment’s existing buttonholes and matches well enough; if it does, use it, and if not, look for a suitable replacement or choose another fastening repair.
- Fabric: Check whether the surrounding cloth is sound; if it is, consider a simple mend, and if it is worn through or delicate, seek skilled advice or decide the garment is not worth repairing.
- Storage: Check whether every sharp tool has a secure place; if it does, return it there after use, and if it does not, add a needle case or safer container before leaving the kit accessible.
Do not buy a large sewing assortment before you know which jobs arise. Excess thread colours and duplicate tools can crowd the basket without making a common repair easier. Elaborately sorting every spare button is not worth the effort if a small labelled envelope keeps the useful ones easy to find.
Decide what deserves mending
Consider the fabric’s condition, the difficulty of the repair and whether you would wear the garment afterwards. A loose button on sound fabric is different from a worn-through seat or a split seam in a strained area.
- Mend it: If the fault is small, the surrounding fabric is sound and you recognise the repair, do it with the supplies at hand; if any of those conditions fail, set it aside or seek advice.
- Set it aside: If you need a matching button, better light or uninterrupted time, put the item in one visible, named place; if it stays there without a clear next action, decide whether to mend it or let it go.
- Ask for help: If the fabric is delicate, the seam carries strain or the repair may affect fit, consult a tailor or experienced sewer; if the issue is a familiar, simple fix, handle it at home.
- Let it go: If the garment is too worn for a useful repair or you would not choose to wear it again, stop keeping it as a possible project; if it remains wearable and valued, choose a specific repair or ask for help.
Say you find a cardigan with a missing button while folding laundry. Its fabric is intact, and a matching spare is in the basket, but you have no time to sew. Put the cardigan in the named mending spot and leave the button with it; the decision is to mend it later, and the observable result is that both garment and fastening wait together rather than becoming separated. If the cardigan were worn through at the buttonhole, the same starting point would call for a different repair or a decision to let it go.
Which choices fit your routine?
What belongs in a basic mending kit?
Keep a needle in a case, a few useful thread colours, small scissors and saved spare buttons. Add a tool only when a repair you actually make calls for it.
Where should you keep spare buttons?
Put them in a small envelope or compartment inside the basket, and label them if you have trouble matching them to garments. If a button cannot be identified or does not fit, keep it separate from pieces ready for use.
Should you mend clothes straight away?
Mend a familiar fault when you have the time and suitable materials. Otherwise, place the garment in a dedicated spot and make the next action clear, such as finding a matching button.
When is a tailor a better choice?
Ask a tailor or experienced sewer when the cloth is delicate, the seam is under strain or the repair could change fit or comfort. For a loose button on sound fabric, a simple hand-sewn repair may be manageable at home.
Keep the routine simple
When folding or putting away clothes, set damaged items beside the basket instead of returning them to the wardrobe. If several people share the work, agree that a garment in the mending spot needs attention and a garment in the wardrobe is ready to wear.
Review the contents when you reach for a tool: if a supply is useful for a repair you make, return it to its place; if it has no clear purpose, remove it. A household mending basket works best when its location, contents and next action are obvious. Use the main phrase—household mending basket—as a reminder to keep the kit close to the clothing routine, not as a reason to mend every garment.