A Rainy Afternoon Plan for Using Up Paper Offcuts
A rainy afternoon plan for using up paper offcuts: sort by size and texture, choose one small project, and make progress with supplies already at home.
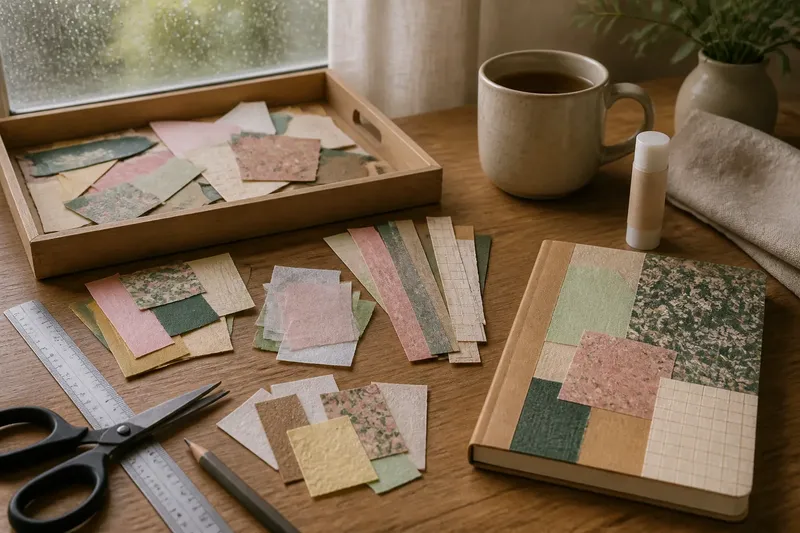
What can you make from paper offcuts without turning a quiet afternoon into a shopping trip? This rainy afternoon plan for using up paper offcuts starts with a quick sort, then gives you one small use to finish with the tools and materials already at home.
Set aside a modest stretch of time, clear a patch of table and bring your scraps together. The aim is not to use every piece or produce something impressive. It is to make the pile easier to understand and choose a project that suits what you have.
Set the afternoon
Choose a point when you can leave a few paper pieces out to dry or finish later, if needed. Put the scraps on a tray, an old sheet of newspaper or a large envelope so they stay together. Bring over scissors, a ruler, a pencil and any glue or tape you already own, but keep the rest of your craft supplies put away for now.
Give yourself permission to stop after sorting. If the paper is dusty, stained, damp or mouldy, set it aside for disposal rather than using it in a project. For clean scraps, avoid spending time trying to make every edge perfect; a slightly irregular piece may be useful as a label, a collage shape or a test sheet.
Keep the working area small enough that you can see the whole pile. A dining table corner or a desk is plenty. If children are joining in, let them choose shapes and colours while an adult handles any tool or material that needs supervision.
Sort for useful choices
Instead of arranging scraps by colour alone, sort them by the decisions they make possible. Put similar sizes together, then notice how the paper feels and behaves. A stiff card offcut can support a tag, while thin paper may fold easily or layer without making a bulky edge.
- Small, sturdy pieces: keep these for tags, labels or collage details.
- Long strips: set aside for paper chains, bookmarks or narrow borders.
- Broad, flat pieces: consider a note card, envelope liner or drawing surface.
- Thin or translucent sheets: use for layering or to see how colours combine.
- Rough, textured or patterned pieces: reserve for a feature shape rather than a precise fold.
Make only a few groups. If a scrap could fit in more than one, place it where it seems most useful and move on. The sorting is there to make a choice easier, not to create a permanent filing system.
Choose one small use
Look at the groups and select a project that fits both the material and your remaining attention. A small use is easier to complete than a broad ambition such as “make something from all this”. Pick one purpose, such as preparing a gift tag, making a bookmark, adding a collage panel to a notebook cover or cutting labels for jars.
Before cutting, check that the chosen pieces suit the job. A tag needs enough stiffness to hold its shape; a bookmark should be long enough to sit visibly above the pages; a collage panel can combine scraps that would be awkward to fold. Use an existing notebook, envelope or blank card as the base, rather than making a separate base from new material.
Say you have a few broad scraps from wrapping paper, a strip of plain card and a notebook with a marked cover. You could trim the scraps into simple shapes, arrange them on the cover without glue, and move them until the design feels balanced. Once you are happy with the placement, attach them using adhesive already suitable for paper, then leave the notebook flat to settle. The visible result is a cover that uses several offcuts while the leftover pile becomes smaller.
Make the time manageable
Divide the session into three loose parts: gather and sort, choose and prepare, then make and tidy. There is no need to watch the clock closely. If sorting takes longer than expected, choose a very quick use or stop there and return another day.
For the making part, lay out only the materials needed for the chosen project. Test a fold or a dab of glue on an unwanted scrap first if you are unsure how the paper will respond. If a piece tears or buckles, use it as a smaller shape or set it aside; forcing it into the original plan can consume more time than choosing another scrap.
Keep the scale deliberately modest. One finished tag or one decorated notebook corner counts. Avoid starting several projects just because the pile contains different colours and textures. A single completed use gives you a clear stopping point and keeps the table from becoming a second storage place.
Use the leftovers wisely
After the project, put the remaining paper into a container you already have, such as a shallow box, a document wallet or a clean envelope. Keep only pieces that have a plausible use. Tiny slivers and heavily damaged scraps may be better sent to paper recycling, if accepted locally, than saved indefinitely.
Place the container somewhere you will naturally reach for paper: near a desk, a wrapping drawer or the notebook you used. Do not label every scrap or sort it again by minute differences in shade. The useful distinction is whether a piece is easy to retrieve for a task you actually do.
What is not worth the effort is trimming every offcut into uniform squares or keeping a scrap solely because it might be useful one day. Those jobs take attention without making the next choice clearer. Save the pieces that suit a real use, and let the rest go responsibly.
Questions about paper scraps?
How small should the scraps be?
Keep pieces that can still serve a purpose, such as a label, collage detail or test piece. If a scrap is too small to handle comfortably or has no likely use, recycle or discard it rather than giving it permanent storage.
Can different paper textures go together?
Yes, if the project benefits from contrast, as a collage often does. For a fold or a firm tag, choose pieces with similar thickness so the result is easier to handle.
What if I do not have glue?
Choose a use that needs no adhesive, such as a bookmark cut from sturdy paper, a note written on a clean offcut or a paper chain joined with a fold-and-slot method. Do not buy glue just to complete one small project.
How do I store scraps after the session?
Use one container you already own and keep it with the paper supplies you reach for. If the scraps repeatedly go unused, reduce the saved pile at the next tidy-up rather than adding more storage.
Leave a clear stopping point
Put away the tools, return reusable pieces to their container and clear the surface before you finish. If a project needs more drying or decorating time, leave it somewhere flat and visible so it does not vanish beneath other work.
A rainy afternoon plan for using up paper offcuts works best when it ends with one useful object, a smaller pile and no new supplies. Next time you need a tag, bookmark or collage detail, check that container before reaching for fresh paper.